Are you preparing for Angular Interview? Buy this book (Including Version 7, 6, 5, 4, 2)


Are you preparing for an Interview? Follow these Tips
Angular framework is also utilized in the cross platform mobile development called IONIC and so it is not limited to web apps only.
Angular is an open source framework written and maintained by angular team at Google and the Father of Angular is Misko Hevery.
Angular is focusing on data-binding, extensible HTML and on application test-ability but it is still in design and prototyping stage.
Stayed Informed - What Is Angular 4 or 5 or 6 or 7 or 8?
Angular framework helps us to build client applications in HTML and JavaScript. Angular 2 is so simpler, faster, modular and instrumented design.
Angular 2 targeting to modern browsers and it is developing using ES6 (ES6 is called ECMAScript version 6). It also support to ECMAScript version 5(ES5).
You don’t worry about the versions of ECMAScript. The ES6 compiler manages to the versioning related problems.
All the Angular 2 framework code is already being written in ECMAScript 6.
The set of supporting modern browsers are :
1. Chrome
2. Firefox
3. Opera
4. Safari
5. IE Version10, 11 and so on...
On mobiles, it is supporting to the list of Chrome on Android, iOS 6+, Windows Phone 8+ and Fire-Fox mobile and also trying to support to older versions of Android.
Angular 2 team working with Traceur compiler team to provide the support to build some extensions. This set of extensions called “ES 6 +A”.
The “Angular 2” is using “Traceur” compiler. Traceur is a compiler that takes “ES6” and compiles it down (ES5) to regular JavaScript that runs in your browsers. It is run everywhere you want to do.
The Angular 2 is focusing on data-binding, extensible HTML and on application test-ability but it is still in design and prototyping stage.
Angular framework helps us to build client applications in HTML and JavaScript.
Angular 2 is so simpler, faster, modular and instrumented design.
Angular 2 targeting to modern browsers and it is developing using ES6 (The ES6 is called ECMAScript version 6). It also support to ECMAScript version 5(ES5).
You don’t worry about the versions of ECMAScript. The compiler manages to the versioning related problems.
All Angular 2 framework code is already being written in ECMAScript 6.
What Is Architecture Overview of Angular?
Angular framework is also utilized in the cross platform mobile development called IONIC and so it is not limited to web apps only.
The bootstrapping process creates the components listed in the bootstrap array and inserts each one into the browser (DOM).
With helps of below Aarchitecture Overview, you can identify the seven main building blocks of an Angular Application.
1. Component
2. Templates
3. Metadata
4. Data Binding
5. Directives
6. Services
7. Dependency Injection
The basic building blocks of an Angular application are NgModules, which provide a compilation context for components.

Angular app is defined by a set of NgModules and it always has at least a root module that enables bootstrapping, and many more feature modules.
1.Components define Template views
2.Components use services
The Angular Module (NgModules) helps us to organize an application into connected blocks of functionality.
The NgModule properties for the minimum “AppModule” generated by the CLI which are follow as -
Declarations — Use to declare the application components.
Imports — Every application must import BrowserModule to run the app in a browser.
Providers — There are none to start.
Bootstrap — This is a root AppComponent that Angular creates and inserts into the index.html host web page.
app.module.ts -
import { BrowserModule } from '@angular/platform-browser';
import { NgModule } from '@angular/core';

import { AppComponent } from './app.component';
import { LoginComponent } from './login/login.component';
import { SignupComponent } from './signup/signup.component';

@NgModule({
  declarations: [
    AppComponent,
    LoginComponent,
    SignupComponent
  ],
  imports: [
    BrowserModule
  ],
  providers: [],
  bootstrap: [AppComponent]
})
export class AppModule { }
By default Bootstrap file is created in the folder “src/main.ts” and “main.ts” file is very stable. Once you have set it up, you may never change it again and its looks like -
import { enableProdMode } from '@angular/core';
import { platformBrowserDynamic } from '@angular/platform-browser-dynamic';

import { AppModule } from './app/app.module';
import { environment } from './environments/environment';

if (environment.production) {
  enableProdMode();
}

platformBrowserDynamic().bootstrapModule(AppModule)
  .catch(err => console.log(err));
The Angular 2 framework consists of several libraries, the some of them working as core and some are optional.
Advantages of Angular 2
1. The Angular 2 has better performance.
2. The Angular 2 has more powerful template system.
3. The Angular 2 provide simpler APIs, lazy loading and easier to application debugging.
4. The Angular 2 much more testable.
5. The Angular 2 provides to nested level components.
6. The Angular 2 execute run more than two programs at the same time.
The ECMAScript is a scripting language which is developed by Ecma International Org.
Currently ECMAScript available in multiple versions that are ES5 and ES6 and both of versions fully supported to Chrome, Firefox, Opera, Safari, and IE etc.
The Traceur is a JavaScript compiler. The Traceur compiler is very popular now days use to allow use to use the features from the future. This compiler is fully supported to ES5, ES6 and also to vNext. The main goal of Traceur compiler is to inform to design of new JavaScript features and wrote the programming code of new efficient and good manners.
1. Angular 2 is Entirely Component Based
2. Directives
3. Dependency Injection
4. Used of TypeScript
5. Used of Lambdas or Arrow functions
6. Generics
7. Forms and Validations
8. And So on.....
Component Based - It is entirely component based. It is not used to scope and controllers and Angular 2 are fully replaced by components and directives.
Directives - The directive can be declared as @Directive annotation.
A component is a directive with a template and the @Component decorator is actually a @Directive decorator extended with template oriented features.
Dependency Injection - Dependency Injection is a powerful pattern for managing code dependencies. There are more opportunities for component and object based to improve the dependency injection.
Use of TypeScript - Type represents the different types of values which are using in the programming languages and it checks the validity of the supplied values before they are manipulated by your programs.
Generics- TypeScript has generics which can be used in the front-end development.
Lambdas and Arrow functions – In the TypeScript, lambdas/ arrow functions are available. The arrow function is additional feature in typescript and it is also known as a lambda function.
Forms and Validations - Angular 2 forms and validations are an important aspect of front-end development.
Why You Used Angular 2?
1. It is entirely component based.
2. Better change detection
3. Angular2 has better performance.
4. Angular2 has more powerful template system.
5. Angular2 provide simpler APIs, lazy loading and easier to application debugging.
6. Angular2 much more testable
7. Angular2 provides to nested level components.
8. Ahead of Time compilation (AOT) improves rendering speed
9. Angular2 execute run more than two programs at the same time.
10.Angular1 is controllers and $scope based but Angular2 is component based.
11.The Angular2 structural directives syntax is changed like ng-repeat is replaced with *ngFor etc.
12.In Angular2, local variables are defined using prefix (#) hash. You can see the below *ngFor loop Example.
13.TypeScript can be used for developing Angular 2 applications
14.Better syntax and application structure
There are more advantages over performance, template system, application debugging, testing, components and nested level components.
For Examples as,
Angular 1 Controller:-
var app = angular.module("userApp", []);
   app.controller("productController", function($scope) {
   $scope.users = [{ name: "Anil Singh", Age:30, department :"IT" },
  { name: "Aradhya Singh", Age:3, department :"MGMT" }];
});
Angular 2 Components using TypeScript:-
Here the @Component annotation is used to add the metadata to the class.
import { Component } from 'angular2/core';
@Component({
  selector: 'usersdata',
  template: `< h3>{{users.name}}</ h3>`
})

export class UsersComponent {
  users = [{ name: "Anil Singh", Age:30, department :"IT" },
  { name: "Aradhya Singh", Age:3, department :"MGMT" }];
}
Bootstrapping in Angular 1 using ng-app,
angular.element(document).ready(function() {
   angular.bootstrap(document, ['userApp']);
});
Bootstrapping in Angular 2,
import { bootstrap } from 'angular2/platform/browser';
import { UsersComponent } from './product.component';

bootstrap(UserComponent);
The Angular2 structural directives syntax is changed like ng-repeat is replaced with *ngFor etc.
For example as,
#Angular 1,Name: {{user.name}}, Age : {{user.Age}}, Dept: {{user.Department}}#Angular2,Name: {{user.name}}, Age : {{user.Age}}, Dept: {{user.Department}}
Note - In the below steps, Viainda is a user in my machine. So that your end, you will see you or your user in your machine.
Steps 1- C:\Users\Viainda>
Steps 2- C:\Users\Viainda>F:
Steps 3- F:\>
Steps 4- F:\>mkdir Ng2DemoApp
Steps 5- F:\>cd Ng2DemoApp
Steps 6- F:\Ng2DemoApp>node --version
Steps 7- F:\Ng2DemoApp>dotnet new --install Microsoft.AspNetCore.SpaTemplates::*
Steps 8- F:\Ng2DemoApp>
Steps 9- F:\Ng2DemoApp>dotnet new angular
Steps 10- F:\Ng2DemoApp>dir
Steps 11- F:\Ng2DemoApp>dotnet restore
Steps 12- F:\Ng2DemoApp>npm install
Steps 13- F:\Ng2DemoApp>start Ng2DemoApp.csproj
Steps 14- After press F5 key on project to displays on your browser with “Hello, world!”.
Reference - Click for more detail...
The TypeScript provides data types as a part of its optional type and its provide us some primitive types as well as a dynamic type “any” and this “any” work like “dynamic”.
In TypeScript, we define a variable with a “type” and appending the “variable name” with “colon” followed by the type name i.e.
let isActive: boolean = false; OR var isActive: boolean = false; let decimal: number = 6; OR var decimal: number = 6; let hex: number = 0xf00d; OR var hex: number = 0xf00d; let name: string = "Anil Singh"; OR var name: string = "Anil Singh"; let binary: number = 0b1010; OR var binary: number = 0b1010; let octal: number = 0o744; OR var octal: number = 0o744; let numlist: number[] = [1, 2, 3]; OR var numlist: number[] = [1, 2, 3]; let arrlist: Array= [1, 2, 3]; OR var arrlist: Array = [1, 2, 3]; #Any Keyword let list: any[] = [1, true, "free"]; list[1] = 100; #Any Keyword let notSureType: any = 10; notSureType = "maybe a string instead"; notSureType = false; // definitely a Boolean
Number : the “number” is a primitive number type in TypeScript. There is no different type for float or double in TypeScript.
Boolean : The “boolean” type represents true or false condition.
String : The “string” represents sequence of characters similar to C#.
Null : The “null” is a special type which assigns null value to a variable.
Undefined : The “undefined” is also a special type and can be assigned to any variable.
Any : this data type is the super type of all types in TypeScript. It is also known as dynamic type and using “any” type is equivalent to opting out of type checking for a variable.
A note about “let” keyword –
You may have noticed that, I am using the “let” keyword instead of “var” keyword. The “let” keyword is actually a newer JavaScript construct that TypeScript makes available. Actually, many common problems in JavaScript are reducing by using “let” keyword. So we should use “let” keyword instead of “var” keyword.
For more Questions on TypeScript, explore this link...
Advantages of AOT -
1. Faster download: - The Angular 2 app is already compiled so it is faster.
2. Faster Rendering: - If the app is not AOT compiled and the compilation process happens in the browser once the application is fully loaded. This has a wait time for all necessary components to be downloaded and then the time taken by the compiler to compile the app. With AOT compilation, this is optimized.
3. Lesser Http Requests: - It is supporting to the lazy loading. Actually, lazy loading is great concepts for sending HTTP request to the server. It is minimise the multiple requests for each associated html and css, there is a separate request goes to the server.
4. Detect error at build time: - In Angular 2, the compilation happens beforehand and most of the errors can be detected at the compile time and this process providing us a better application’s stability.
Disadvantages of AOT -
1. AOT only works only with HTML and CSS and not for other file types. If required other file types that time we will need to follow the previous build step.
2. We need to maintain AOT version of bootstrap file.
3. We need to clean-up step before compiling.
Lazy Loading speeds up the application initial load time by splitting the code into multiple bundles and loading them on demand.
1. Each and every Angular2 application must have one main module that is called “AppModule” and your code should be splitted into various child modules based on your applications.
2. We do not require to import or declare lazily loading module in root module.
3. Add the route to top level routing and takes routes array and configures the router.
4. Import module specific routing in the child module.
5. And so on.
1. Consider AOT compilation.
2. Consider lazy loading instead of fully bundled app if the app size is more.
3. Keep in mind, your application is bundled and disfeatured.
4. Keep in mind, your application doesn’t have un-necessary import statements.
5. Keep in mind, your application’s 3rd party unused library. If exist and not used, removed from your application.
6. Remove your application dependencies if not required.
What are the Securities Threats should we be Aware of in Angular 2 Applications?
As like your other web applications, you should flow in angular 2 applications also.
There are some basic guidelines to mitigate the security risks.
1. Consider using AOT compilation.
2. Try to avoid using or injecting dynamic HTML content to your component.
3. Try to avoid using external URLs if not trusted.
4. Try to prevent XSRF attack by restricting the REST APIs.
If you are using external resources like HTML, CSS, which is coming from outside the application in case you follow best practice/cleanly your apps.
Angular 1 and Angular 2 Integration
1. Angular frameworks provide the support of mixing code of Angular 1 and Angular 2 in the same application.
2. We can write the mixing components of Angular 1 and Angular 2 in the same view.
3. We can inject services across frameworks of Angular 1 and Angular 2 in the same application.
4. Both Angular 1's and Angular 2's data binding works across frameworks in the same view.
1. The constructor is a default method runs when component is being constructed.
2. The constructor is a typescript feature and it is used only for a class instantiations and nothing to do with Angular 2.
3. The constructor called first time before the ngOnInit().
Angular 2 ngOnInit:-
1. The ngOnInit event is an Angular 2 life-cycle event method that is called after the first ngOnChanges and the ngOnInit method is use to parameters defined with @Input otherwise the constructor is OK.
2. The ngOnInit is called after the constructor and ngOnInit is called after the first ngOnChanges.
3. The ngOnChanges is called when an input or output binding value changes.
Example as,
import {Component, OnInit} from '@angular/core';

export class App implements OnInit{
  constructor(){
  }

  ngOnInit(){
  }
}
In Angular2, there is no “ng-init” but we can create a ways like this using the directive and ngOnInit class. Angular 2 provides life cycle hook ngOnInit by default.
The ngOnInit is invoked when the component is initialized and invoked only once when the directive is instantiated. It is a best practice to implement these life-cycle interfaces.
According to Angular2 Doc, “The ngOnInit is called right after the directive's data-bound properties have been checked for the first time, and before any of its children have been checked. It is invoked only once when the directive is instantiated.”
For example as,
import { Directive, Input } from '@angular/core';

@Directive({
  selector: '[ngInit]'
})

class NgInit {
  @Input() ngInit;

  ngOnInit() {
    if(this.ngInit) { this.ngInit(); }
  }
}
In template as following,
< div *ngIf="Timer.dateTime === currentDateTime" >
    < div *ngIf="Timer.checked" [ngInit]="Start" >< / div >
    < div *ngIf="!Timer.checked" [ngInit]="Stop" >< / div >
< / div >
1. ngOnChanges - called when an input binding value changes.
2. ngOnInit - after the first ngOnChanges.
3. ngDoCheck - after every run of change detection.
4. ngAfterContentInit - after component content initialized.
5. ngAfterContentChecked - after every check of component content.
6. ngAfterViewInit - after component's view(s) are initialized.
7. ngAfterViewChecked - after every check of a component's view(s).
8. ngOnDestroy - just before the component is destroyed.
Angular 2 Lifecycle Events Log:-
1. onChanges
2. onInit
3. doCheck
4. afterContentInit
5. afterContentChecked
6. afterViewInit
7. afterViewChecked
8. doCheck
9. afterContentChecked
10.afterViewChecked
11.onChanges
12.doCheck
13.afterContentChecked
14.afterViewChecked
15.onDestroy
Angular 2 Constructors:-
The constructor is a default method runs when component is being constructed.
The constructor is a typescript feature and it is used only for a class instantiations and nothing to do with Angular 2.
The constructor called first time before the ngOnInit().
Example as,
import {Component} from 'angular2/core';
import {UserService} from './userService';

@Component({
  selector: ‘list-user’,
  template: `< ul >< li *ngFor="#user of users">{{user.name}}</ li >< / ul >`
})

class App_Component {
  users:Array;
  constructor(private _userService: UserService) {
      this.users = _userService.getUsers();
  }
}
Angular 2 ngOnInit and ngOnChanges:-
The ngOnInit event is an Angular 2 life-cycle event method that is called after the first ngOnChanges and the ngOnInit method is use to parameters defined with @Input otherwise the constructor is OK.
The ngOnInit is called after the constructor and ngOnInit is called after the first ngOnChanges.
The ngOnChanges is called when an input or output binding value changes.
Examples as,
import {Component, OnInit} from '@angular/core';
export class App implements OnInit{
  constructor(){
  }

  ngOnInit(){
  }
}
Angular 2 ngOnDestroy :-
The ngDestroy directive is called in a component lifecycle just before the instance of the component is finally destroyed.
Example as,
@Directive({
    selector: '[destroyDirective]'
})
export class OnDestroyDirective implements OnDestroy {

  //Call Constructor and set hello Msg.
  constructor() {
    this.helloMsg = window.setInterval(() => alert('Hello, I am Anil'), 2000);
  }

  //Destroy to the component
  ngOnDestroy() {
     window.clearInterval(this.helloMsg);
  }
}
1. Smaller & Faster Apps
2. View Engine Size Reduce
3. Animation Package
4. NgIf and ngFor Improvement
5. Template
6. NgIf with Else
7. Use of AS keyword
8. Pipes
9. HTTP Request Simplified
10.Apps Testing Simplified
11.Introduce Meta Tags
12.Added some Forms Validators Attributes
13.Added Compare Select Options
14.Enhancement in Router
15.Added Optional Parameter
16.Improvement Internationalization
Explore in detial with examples..
1. Make AOT the default
2. Watch mode
3. Type checking in templates
4. More flexible metadata
5. Remove *.ngfactory.ts files
6. Better error messages
7. Smooth upgrades
8. Tree-Shakeable components
9. Hybrid Upgrade Application
10.And so on...
Angular 5 Performance Improvements -
1. Use of addEventListener for the faster rendering and it is the core functionality.
2. Update to new version of build-optimizer.
3. Added some Improvements on the abstract class methods and interfaces
4. Remove decorator DSL which depends on Reflect for Improve the Performance of Apps and This is the core functionality.
5. Added an option to remove blank text nodes from compiled templates
6. Switch Angular to use Static-Injector instead of Reflective-Injector.
7. Improve the applications testing.
8. Improve the performance of hybrid applications
9. Improvements on Lazy loading for Angular
10.And so on...
Explore in detial with examples..
The Angular Team are working on lots of bug fixes, new features and added/update/remove/ re-introduce/ and may more things.
Let’s start to explore all changes of Angular 6 step by step!
Added ng update - This CLI commands will update your angular project dependencies to their latest versions. The ng update is normal package manager tools to identify and update other dependencies.
# ng update
Angular 6 uses RxJS 6 - this is the third-party library (RxJS) and introduces two important changes as compared to RxJS 5.
1. RxJS 6 introduces a new internal package structure
2. Operator concept
Both are requires you to update your existing code
To update to RxJS 6, you simply run -
# npm install --save rxjs@6
Explore in detial with examples..
Angular 7 being smaller, faster and easier to use and it will making developers life easier. Now Angular 7 is released! This is a major release and expanding to the entire platform including -
1. Core framework
2. Angular Material
3. CLI
Let’s introduce added and modified new features of Angular 7 -
1. Added a new interface - UrlSegment[] to CanLoad interface
2. Added a new interface - DoBootstrap interface
3. Angular 7 added a new compiler - Compatibility Compiler (ngcc)
4. Introduce a new Pipe called - KeyValuePipe
5. Angular 7 now supporting to TypeScript 2.9 and Added Virtual Scrolling and Drag & Drop
6. Added a new elements features - enable Shadow DOM v1 and slots
7. Added a new router features - warn if navigation triggered outside Angular zone
8. Added a new mappings for ngfactory and ngsummary files to their module names in AOT summary resolver.
9. Added a new "original" placeholder value on extracted XMB
10.Added a new ability to recover from malformed URLs
11.Added a new compiler support dot (.) in import statements and also avoid a crash in ngc-wrapped
12.Update compiler to flatten nested template fns
Angular 7 added a new compiler that is called Angular Compatibility Compiler (ngcc).
The ngcc Angular node_module compatibility compiler - The ngcc is a tool which "upgrades" node_module compiled with non-ivy ngc into ivy compliant format.
This compiler will convert node_modules compiled with Angular Compatibility Compiler (ngcc), into node_modules which appear to have been compiled with TSC compiler transformer (ngtsc) and this compiler conversions will allow such “legacy” packages to be used by the Ivy rendering engine.
TSC transformer which removes and converts @Pipe, @Component, @Directive and @NgModule to the corresponding definePipe, defineComponent, defineDirective and defineInjector.
UrlSegment Interface -
UrlSegment interface represents a single URL segment and the constructor, properties, and methods look like below UrlSegment class i.e.
classUrlSegment {
constructor(path: string, parameters: {...})
 path: string
 parameters: {...}
 toString(): string
}
Explore in detial with examples..
=> Added Support for TypeScript 3.2
=> Added a Navigation Type Available during Navigation in the Router
=> Added pathParamsOrQueryParamsChange mode for runGuardsAndResolvers in the Router
=> Allow passing state to routerLink Directives in the Router
=> Allow passing state to NavigationExtras in the Router
=> Restore whole object when navigating back to a page managed by Angular Router
=> Added support for SASS
=> Resolve generated Sass/Less files to .css inputs
=> Added Predicate function mode for runGuardsAndResolvers:-
This option means guards and resolvers will ignore changes when a provided predicate function returns `false`. This supports use cases where an application needs to ignore some param updates but not others.
For example, changing a sort param in the URL might need to be ignored, whereas changing the `project` param might require re-run of guards and resolvers.
=> Added functionality to mark a control and its descendant controls as touched: - add markAllAsTouched () to AbstractControl
=> => Added ng-new command that builds the project with Bazel
=> => Use image based cache for windows BuildKite
=> => Export NumberValueAccessor & RangeValueAccessor directives
=>
=> Use shared DomElementSchemaRegistry instance for improve performance of platform-server (@angular/platform-server):-
Right now the ServerRendererFactory2` creates a new instance of the `DomElementSchemaRegistry` for each and every request, which is quite costly (for the Tour of Heroes SSR example this takes around **15%** of the overall execution time)
=> Now the Performance Improvements on core, more consistent about “typeof checks”: -
When testing whether `value` is an object, use the ideal sequence of strictly not equal to `null` followed by `typeof value === 'object'` consistently. Specifically there's no point in using double equal with `null` since `undefined` is ruled out by the `typeof` check.
Also avoid the unnecessary ToBoolean check on `value.ngOnDestroy` in `hasOnDestroy()`, since the `typeof value.ngOnDestroy === 'function'` will only let closures pass and all closures are truish (with the notable exception of `document.all`, but that shouldn't be relevant for the `ngOnDestroy` hook)
=> In the Compiler-CLI, expose ngtsc as a TscPlugin
=> Restore whole object when navigating back to a page managed by Angular Router:-
This feature adds a few capabilities. First, when a `popstate` event fires the value of `history.state` will be read and passed into `NavigationStart`. In the past, only the `navigationId` would be passed here.
Additionally, `NavigationExtras` has a new public API called `state` which is any object that will be stored as a value in `history.state` on navigation.
For example, the object `{foo: 'bar'}` will be written to `history.state` here: -`router.navigateByUrl('/simple', {state: {foo: 'bar'}});`
Explore in detial with examples..
In AngularJs, we are handling using scope, directives and controllers but all those concepts are using in a single combined that is called components.
The component is the core functionality of Angular 2 app but we need to know to pass the data in to the components to configure them.
To build an Angular 2 application you define a set of components, for every HTML elements, views, and route.
Angular 2 applications must have a root component that contains all other components. That means all Angular 2 applications have a component tree.
Application > Component > Component1 and Component2
Example of Components,
import { Component } from '@angular/core';
import { CommonModule } from '@angular/common';

@Component({
    selector: 'home',
    templateUrl: './home.component.html',
    styleUrls: ['./home.component.css'],
})

export class HomeComponent {
    userlist: Users[];

    constructor() {
        this.userlist = [
            { Id: '1001', name: 'Anil Singh', site: 'https://www.code-sample.com' },
            { Id: '1002', name: 'Alok', site: 'https://www.code-view.com' },
            { Id: '1003', name: 'Reena', site: 'https://www.code-sample.xyz' },
            { Id: '1004', name: 'Dilip', site: 'https://www.codefari.com' },
        ];
    }

    values = '';
    onKeyUp(event: any) {
        this.values = event.target.value;
        console.log(this.values);
    };

    onKeyDown(event: any) {
        this.values = event.target.value;
        console.log(this.values);
    };
}

export class Users {
    Id: String;
    name: String;
    site: String;
}

/* For HTML Components
 < input type="text" [(value)]="values" (keyup)="onKeyUp($event)" (keydown)="onKeydown($event)" / >
*/
Angular 2 Component Summary :
1. Angular 2 Component meta-data annotation is used to register the components.
2. Angular 2 components are used to create UI widgets.
3. Angular 2 components are used to split to application into smaller parts.
4. Only one component is used per DOM element.
5. In the Angular 2 components, @View, template and templateUrl are mandatory in the components.
1. @Component meta-data annotation is used to register the components.
2. The components are used to create UI widgets.
3. The components are used to split to application into smaller parts.
4. Only one component is used per DOM element.
5. In the components, @View, template and templateUrl are mandatory in the components.
Example as,
import {Component, View} from 'angular2/core';

@Component({
   selector: 'hello-world'
})

@View({
   template: "< h1 >Hello  {{angular}}< / h1 >"
})

class hello {
 constructor(public angular: string) {}
}

#HTML Code
< hello-world >< / hello-world >
@Directive :-
1. @Directive meta-data annotation is used to register the directives.
2. The directives are used to add behavior to existing DOM elements.
3. The directives are use to design a reusable components.
4. More than one directive are used per DOM element.
5. The directive do not have @View etc.
Example as,
import {Component, View} from 'angular2/core'';

@Component({
    selector: 'user-detail'
})

@View({
    template: "< div > < h1 >{{userName}}< / h1 > < p >{{phone}}< / p >"
})
class userDetail {
    constructor(public userName: string, public phone: string) {}
}

#HTML Code
< user-detail >< / user-detail >
A component is a directive-with-a-template and the @Component decorator is actually a @Directive decorator extended with template-oriented features.There are three kinds of directives in Angular :-
Components : directives with a template.
Structural directives : change the DOM layout by adding and removing DOM elements.
Attribute directives : change the appearance or behaviour of an element, component, or another directive.
1. ngOnChanges - called when an input binding value changes.
2. ngOnInit - after the first ngOnChanges.
3. ngDoCheck - after every run of change detection.
4. ngAfterContentInit - after component content initialized.
5. ngAfterContentChecked - after every check of component content.
6. ngAfterViewInit - after component's view(s) are initialized.
7. ngAfterViewChecked - after every check of a component's view(s).
8. ngOnDestroy - just before the component is destroyed.
Angular 2 Constructors:-
The constructor is a default method runs when component is being constructed.
The constructor is a typescript feature and it is used only for a class instantiations and nothing to do with Angular 2.
The constructor called first time before the ngOnInit().
Example as,
import {Component} from 'angular2/core';
import {UserService} from './userService';

@Component({
  selector: ‘list-user’,
  template: `< ul >< li *ngFor="#user of users">{{user.name}}</ li >< / ul >`
})

class App_Component {
  users:Array;
  constructor(private _userService: UserService) {
      this.users = _userService.getUsers();
  }
}
Angular 2 ngOnInit and ngOnChanges:-
The ngOnInit event is an Angular 2 life-cycle event method that is called after the first ngOnChanges and the ngOnInit method is use to parameters defined with @Input otherwise the constructor is OK.
The ngOnInit is called after the constructor and ngOnInit is called after the first ngOnChanges.
The ngOnChanges is called when an input or output binding value changes.
Examples as,
import {Component, OnInit} from '@angular/core';
export class App implements OnInit{
  constructor(){
  }

  ngOnInit(){
  }
}
Angular 2 ngOnDestroy :-
The ngDestroy directive is called in a component lifecycle just before the instance of the component is finally destroyed.
Example as,
@Directive({
    selector: '[destroyDirective]'
})
export class OnDestroyDirective implements OnDestroy {

  //Call Constructor and set hello Msg.
  constructor() {
    this.helloMsg = window.setInterval(() => alert('Hello, I am Anil'), 2000);
  }

  //Destroy to the component
  ngOnDestroy() {
     window.clearInterval(this.helloMsg);
  }
}
Angular 2 Lifecycle Events Log:-1. onChanges
2. onInit
3. doCheck
4. afterContentInit
5. afterContentChecked
6. afterViewInit
7. afterViewChecked
8. doCheck
9. afterContentChecked
10.afterViewChecked
11.onChanges
12.doCheck
13.afterContentChecked
14.afterViewChecked
15.onDestroy
@Input is used to define an input for a component, we use the @Input decorator.
Angular 2 components is the core components of applications but you must need to know “how to pass data into components to dynamically?” and that time you need to define an input component.
You can see the below example for passing the user data in to the components.
Example 1,
import { Component, Input } from '@angular/core';

@Component({
  selector: “user-info”,
  template: “Hello, This is {{ userInfo.name}}”
})

export class UserInfo {
  @Input() userInfo;
  constructor() { }
}

#HTML code
< user-info [userInfo]="currentUser" >< / user-info >
The components < user-info >< / user-info > is use to render the user information on the view.Example 2,
import { Component } from '@angular/core';

@Component({
  selector: 'app-root',
  styles: [`
    .app {
      text-align: center;
      background: #f5f5f5;
    }
  `],
  template: `
    < div class="app" >
      < counter [count]="defaultCount" >< / counter >
    < / div >
  `
})
export class AppComponent {
  defaultCount: number = 20;
@Output decorates output properties and its binds a property of the type of angular EventEmitter.
If you want to bind an event on an element, you can use the new Angular2 events i.e.
@Component(...)
   class yourComponent {
      addUser(event) {
     }
}
The method addUser() will be called when user clicked on button.< button (click)="addUser()" >Click< / button > < button (click)="addUser($event)" >< / button >
What happen if you want to create a custom event?
Now come to the outputs, if you want to create your custom event in Angular 2 that time we will use to new @Outputdecorator.
Example as,
import { Component} from 'angular2/core';
import {  bootstrap} from 'angular2/platform/browser';

@Component({
    selector: 'my-app',
    providers: [Service],
    template: '< div >Hello my name is {{name}}!< / div >'
})
class MyApp {
    constructor(service: Service) {
        this.name = service.getName();
        setTimeout(() => this.name = 'Anil Singh,', 1000);
    }
    }
    class Service {
      getName() {
        return 'Hello';
    }
}

bootstrap(App);
In the above example, we will need to import Output and Event-Emitter to create our new custom event.import { Component , Output, EventEmitter} from 'angular2/core';
import { bootstrap} from 'angular2/platform/browser';
@Component({
selector: 'my-app',
providers: [Service],
template: '< div >Hello my name is {{name}}!< / div >'
})
class MyApp {
constructor(service: Service) {
this.userClicked.emit(this.user);
this.name = service.getName();
setTimeout(() => this.name = 'Anil Singh,', 1000);
}
}
class Service {
getName() {
return 'Hello';
}
@Output() userClicked = new EventEmitter();
}
bootstrap(App);
Now when we are using the components anywhere in our application, we can bind the custom event i.e.
< my-app (userClicked)="userClicked($event)" >< / my-app >
It is closest cousin of ng-show and ng-hide.
It is more powerful to bind any property of elements. Both the ng-show and ng-hide are used to manage the visibility of elements using ng-hide css class. It is also set the display property “display:none”.
All the above features are supported in Angular 2 but added some extra feature like animations etc.
Syntax:-
< div [hidden]="!active" >
    Hello, this is active area!
< / div >
Note: - Don't use hidden attribute with Angular 2 to show/hide elements.
Question:- Don't use hidden attribute with Angular 2. Here is why?
The hidden attribute is used to hide elements. Browsers are not supposed to display elements that have the hidden attribute specified. Browsers attach "display: none" styles to elements with hidden attribute.
Example as,
import { Component } from 'angular2/core';

@Component({
  selector: 'demo',
  templateUrl: 'app/component.html'
})
export class MainComponent {
  Ishide: true;
}

#HTML Code
< div [hidden]="Ishide" >
     Hey, I’m using hidden attribute.
< / div >
Works great but some time its override hidden attribute with some css and that time behave wrong!..
For example,
Be sure to don't have a display css rule on your tags who override hidden behaviour like i.e.
p {
    display: inline-block !important;
}
The above hidden html attributes acts like display: none;
1. $rootScope,
2. $scope,
3. $emit,
4. $broadcast
Now In Angular 2, we have different ways to communicate between components.
A parent component and its children share a service whose interface enables bi-directional communication within the family.
The following examples for Services communication,
import {Injectable} from '@angular/core';

@Injectable()
export class MyService {
  constructor() { }
}

import { Component } from '@angular/core';

@Component({
  selector: 'my-app',
  templateUrl: './myApp.component.html'
})
export class MyAppComponent { }
The following example to calling service from any other component,
import {Component, OnInit} from '@angular/core';
import {MyService} from './app/myService';

@Component({
  selector: '< my-component >< / my-component >',
  templateUrl: 'app/component.html',
  providers: [MyService]
})

export class MyComponent implements OnInit {
  constructor(private msInstance: MyService) {}
  ngOnInit() {
      this.msInstance.getServices();
  }
}
Example for Sibling Component Communication,
import { Component, ViewChild, AfterViewInit } from '@angular/core';
import { ListComponent } from './list.component';
import { DetailComponent } from './detail.component';

@Component({
  selector: 'app-component',
  template: '< list-component >< / list-component >< detail-component >< / detail-component >',
  directives: [ListComponent, DetailComponent]
})
class AppComponent implements AfterViewInit {
  @ViewChild(ListComponent) listComponent:ListComponent;
  @ViewChild(DetailComponent) detailComponent: DetailComponent;

  ngAfterViewInit() {
    //Afther this point the children are set, so you can use them
    this.detailComponent.doSomething();
  }
}
In Angular 2, the ngModel provides error objects for each of the built-in input validators. You can access these errors from a reference to the ngModel itself then build useful messaging around them to display to your users.
And also, we can use the properties “pristine” and “touched” to display error messages.
1. If we want to display errors after the user fills something in a field, use the pristine property.
2. If we want to display errors after the user put the focus on a field, use the touched property.
Example as,
< div *ngIf="(!loginForm.controls.email.valid && !loginForm.controls.email.pristine)" >
  **Email is required.
< / div >
In Angular Renderer and ElementRef are used for DOM Manipulation and Renderer and ElementRef are used together to get full platform abstraction.
Renderer :–
Renderer is a class that is a partial abstraction done the DOM manipulations and the DOM manipulating is not breaking server side rendering or web workers.
ElementRef :–
ElementRef is a class that is a partial abstraction done the DOM Manipulations without breakable environments and it also can hold a reference to a DOM elements.
If “ElementRef” is injected to a component, the injected instance is a reference to the host element of the current component.
The ways to get an ElementRef instance looks like,
1. @ViewChild()
2. @ViewChildren()
3. @ContentChild()
4. @ContentChildren()
In this case the ElementRef is a reference to the matching elements in the templates.
Do notice that you should refrain from using ElementHref as it flagged with a security risk?
If you allow direct access to the DOM, it can make your application more vulnerable to XSS attacks. So make sure, when you are using to ElementRef in your app code.
What Is the point of calling renderer.invokeElementMethod(rendererEl, methodName)?
#root app component

import {Component, ElementRef} from 'angular2/core'
import * as browser from 'angular2/platform/browser'
import {Ruler, Rectangle} from 'angular2/src/platform/browser/ruler.js'

@Component({
  selector: 'my-app',
  providers: [ElementRef],
  template: `
    < div >
      < h2 >Hello {{name}}< / h2 >
      < p >H2 Height: {{rect.height}}< / p >
      < p >H2 Width: {{rect.width}}< / p >
    < / div >
  `,
  directives: []
})
export class App {
  constructor(element: ElementRef) {
    this.name = 'Angular2'
    this.element = element;
    this.ruler = new Ruler(new browser.BrowserDomAdapter());
    this.rect = {};
  }
  ngOnInit() {
    var vm = this;
    var measure = this.ruler.measure(this.element);
    measure.then(function (rect) {
        console.log('Rect', rect);
        vm.rect = rect;
    });
  }
}
The Router is use to map applications URLs to application components. There are three main components that you are using to configure routing.
1. Routes: - It uses to describe our application's Routes.
2. Router Imports: - It uses to import our application's Routes.
3. RouterOutlet: - It is a placeholder component and use to get expanded to each route's content.
4. RouterLink: - It is use to link to application's routes.
Routes: - The Routes is uses to describe our application's Routes. The “RouterModule.forRoot” method in the module imports to configure the router.
Five concepts that need routes representation :-
1. Path (a part of the URL)
2. Route Parameters
3. Query/Matrix Parameters
4. Name outlets
5. A tree of route segments targeting outlets
Syntax:-
RouterModule.forRoot([
            { path: '', redirectTo: 'home', pathMatch: 'full' },
            { path: 'home/:id', component: HomeComponent }, //HERE ID IS A ROUTE PARAMETER.
            { path: 'login', component: LoginComponent },
            { path: 'registration', component: RegistrationComponent },
            { path: '**', redirectTo: 'home' }
        ])
Example as,
@NgModule({
    bootstrap: [ AppComponent ],
    declarations: [
        AppComponent,
        HomeComponent,
        HeaderComponent,
        MenuComponent,
        LoginComponent,
        RegistrationComponent
    ],
    imports: [
        UniversalModule, // MUST BE FIRST IMPORT. THIS AUTOMATICALLY IMPORTS BROWSERMODULE, HTTPMODULE, AND JSONPMODULE TOO.
        RouterModule.forRoot([ //RouterModule.forRoot method in the module imports to configure the router.
            { path: '', redirectTo: 'home', pathMatch: 'full' },
            { path: 'home/:id', component: HomeComponent }, //HERE ID IS A ROUTE PARAMETER.
            { path: 'login', component: LoginComponent },
            { path: 'registration', component: RegistrationComponent },
            { path: '**', redirectTo: 'home' }
        ]),
        FormsModule,
        ReactiveFormsModule
    ]
})
Router Imports: - The Angular Router is an optional service that presents a particular component view for a given URL i.e.
import { RouterModule, Routes } from '@angular/router';
Example as,
import { NgModule } from '@angular/core';
import { RouterModule, Routes } from '@angular/router';
import { UniversalModule } from 'angular2-universal';
import { FormsModule, ReactiveFormsModule } from '@angular/forms';
import { HttpModule } from '@angular/http';

import { AppComponent } from './components/app/app.component';
import { HomeComponent } from './components/home/home.component';
import { HeaderComponent } from './components/shared/header/header.component';
import { MenuComponent } from './components/menu/menu.component';
import { LoginComponent } from './components/login/login.component';
import { RegistrationComponent } from './components/registration/registration.component'


@NgModule({
    bootstrap: [ AppComponent ],
    declarations: [
        AppComponent,
        HomeComponent,
        HeaderComponent,
        MenuComponent,
        LoginComponent,
        RegistrationComponent
    ],
    imports: [
        UniversalModule, // MUST BE FIRST IMPORT. THIS AUTOMATICALLY IMPORTS BROWSERMODULE, HTTPMODULE, AND JSONPMODULE TOO.
        RouterModule.forRoot([ //RouterModule.forRoot method in the module imports to configure the router.
            { path: '', redirectTo: 'home', pathMatch: 'full' },
            { path: 'home/:id', component: HomeComponent }, //HERE ID IS A ROUTE PARAMETER.
            { path: 'login', component: LoginComponent },
            { path: 'registration', component: RegistrationComponent },
            { path: '**', redirectTo: 'home' }
        ]),
        FormsModule,
        ReactiveFormsModule
    ]
})
Router-outlet directive:- Router-outlet directive is used to render the components for specific location of your applications. Both the template and templateUrl render the components where you use this directive.
Syntax :-
< router-outlet >< / router-outlet >
Example as,
< div class='container' >
    < div class='row' >
        < router-outlet >< / router-outlet >
    < / div>
< / div>
The Route Params: - The route parameter is used to map given URL's parameters based on the rout URLs and it is an optional parameters for that route.
Syntax: -
params: {[key: string]: string}
Example as,
@NgModule({
    bootstrap: [ AppComponent ],
    declarations: [
        AppComponent,
        HomeComponent,
        HeaderComponent,
        MenuComponent,
        LoginComponent,
        RegistrationComponent
    ],
    imports: [
        UniversalModule, // MUST BE FIRST IMPORT. THIS AUTOMATICALLY IMPORTS BROWSERMODULE, HTTPMODULE, AND JSONPMODULE TOO.
        RouterModule.forRoot([ //ROUTERMODULE.FORROOT METHOD IN THE MODULE IMPORTS TO CONFIGURE THE ROUTER.
            { path: '', redirectTo: 'home', pathMatch: 'full' },
            { path: 'home/:id', component: HomeComponent }, //HERE ID IS A ROUTE PARAMETER.
            { path: 'login', component: LoginComponent },
            { path: 'registration', component: RegistrationComponent },
            { path: '**', redirectTo: 'home' }
        ]),
        FormsModule,
        ReactiveFormsModule
    ]
})
Router-link directive: - Router-link directive is used to link a specific part of your applications.
Syntax :-
< router-link >< / router-link >
Example as,
< ul class='nav navbar-nav'>
    < li [routerLinkActive]="['link-active']" >
        < a [routerLink]="['/login']" >
            < span class='glyphicon glyphicon-Login'>< / span > Login
        < / a >
    < / li >
    < li [routerLinkActive]="['link-active']" >
        < a [routerLink]="['/registration']" >
            < span class='glyphicon glyphicon-Register' >< / span > Register
        < / a >
    < / li >
    < li [routerLinkActive]="['link-active']" >
        < a [routerLink]="['/Billing']" >
            < span class='glyphicon glyphicon-Billing' >< / span > Billing
        < / a>
    < / li >
< / ul >
The Routes is uses to describe our application's Routes. The RouterModule.forRoot method in the module imports to configure the router.
Five concepts that need Routes Representation :-
1. Path (a part of the URL)
2. Route Parameters
3. Query/Matrix Parameters
4. Name outlets
5. A tree of route segments targeting outlets
Syntax:-
RouterModule.forRoot([
            { path: '', redirectTo: 'home', pathMatch: 'full' },
            { path: 'home/:id', component: HomeComponent }, //HERE ID IS A ROUTE PARAMETER.
            { path: 'login', component: LoginComponent },
            { path: 'registration', component: RegistrationComponent },
            { path: '**', redirectTo: 'home' }
        ])
Example as,
@NgModule({
    bootstrap: [ AppComponent ],
    declarations: [
        AppComponent,
        HomeComponent,
        HeaderComponent,
        MenuComponent,
        LoginComponent,
        RegistrationComponent
    ],
    imports: [
        UniversalModule, // MUST BE FIRST IMPORT. THIS AUTOMATICALLY IMPORTS BROWSERMODULE, HTTPMODULE, AND JSONPMODULE TOO.
        RouterModule.forRoot([ //RouterModule.forRoot method in the module imports to configure the router.
            { path: '', redirectTo: 'home', pathMatch: 'full' },
            { path: 'home/:id', component: HomeComponent }, //HERE ID IS A ROUTE PARAMETER.
            { path: 'login', component: LoginComponent },
            { path: 'registration', component: RegistrationComponent },
            { path: '**', redirectTo: 'home' }
        ]),
        FormsModule,
        ReactiveFormsModule
    ]
})
The Angular Router is an optional service that presents a particular component view for a given URL i.e.
import { RouterModule, Routes } from '@angular/router';
Stayed Informed - Routing Concepts
Example as,
import { NgModule } from '@angular/core';
import { RouterModule, Routes } from '@angular/router';
import { UniversalModule } from 'angular2-universal';
import { FormsModule, ReactiveFormsModule } from '@angular/forms';
import { HttpModule } from '@angular/http';

import { AppComponent } from './components/app/app.component';
import { HomeComponent } from './components/home/home.component';
import { HeaderComponent } from './components/shared/header/header.component';
import { MenuComponent } from './components/menu/menu.component';
import { LoginComponent } from './components/login/login.component';
import { RegistrationComponent } from './components/registration/registration.component'

@NgModule({
    bootstrap: [ AppComponent ],
    declarations: [
        AppComponent,
        HomeComponent,
        HeaderComponent,
        MenuComponent,
        LoginComponent,
        RegistrationComponent
    ],
    imports: [
        UniversalModule, // MUST BE FIRST IMPORT. THIS AUTOMATICALLY IMPORTS BROWSERMODULE, HTTPMODULE, AND JSONPMODULE TOO.
        RouterModule.forRoot([ //RouterModule.forRoot method in the module imports to configure the router.
            { path: '', redirectTo: 'home', pathMatch: 'full' },
            { path: 'home/:id', component: HomeComponent }, //HERE ID IS A ROUTE PARAMETER.
            { path: 'login', component: LoginComponent },
            { path: 'registration', component: RegistrationComponent },
            { path: '**', redirectTo: 'home' }
        ]),
        FormsModule,
        ReactiveFormsModule
    ]
})
The Router-Link, RouterLink-Active and Router-Outlet are directives provided by the Angular RouterModule package. It is Provides the navigation and URLs manipulation capabilities.
Router-outlet directive:- Router-outlet directive is used to render the components for specific location of your applications.
Both the template and templateUrl render the components where you use this directive.
Syntax:-
< router-outlet > < / router-outlet >
Example as,
< div class='container' >
    < div class='row'>
        < router-outlet >< / router-outlet >
    < / div >
< / div >
Yes, It's possible. We can use multiple router-outlets in same template by configuring our routers and simply add the router-outlet name. You can see in the example.
Syntax:-
< div class="row" >
  < div class="user" >
    < router-outlet name="userList" >< / router-outlet >
  < / div >
  < div class="userInfo" >
    < router-outlet name="userInfo" >< / router-outlet >
  < / div >
< / div >
And setup your route config:
const routes: Routes = [
  { path: '', redirectTo: 'home', pathMatch: 'full' },
  { path: 'home', component: HomeComponent },
  { path: 'user', component: userComponent, children: [
     { path: 'userList', component: userListComponent, outlet: 'userList' },
     { path: ':id', component: userInfoComponent, outlet: 'userInfo' }]
  }];

@NgModule({
  imports: [RouterModule.forRoot(routes)],
  exports: [RouterModule],
  providers: []
})
export class RoutingModule { }
Router-link directive:- Router-link directive is used to link a specific part of your applications.
Syntax:-
< router-link > < / router-link >
Example as,
< ul class='nav navbar-nav'>
    < li [routerLinkActive]="['link-active']" >
        < a [routerLink]="['/login']" >
            < span class='glyphicon glyphicon-Login'>< / span > Login
        < / a >
    < / li >
    < li [routerLinkActive]="['link-active']" >
        < a [routerLink]="['/registration']" >
            < span class='glyphicon glyphicon-Register' >< / span > Register
        < / a >
    < / li >
    < li [routerLinkActive]="['link-active']" >
        < a [routerLink]="['/Billing']" >
            < span class='glyphicon glyphicon-Billing' >< / span > Billing
        < / a>
    < / li >
< / ul >
The @NgModule is a new decorator. This module is recently added in Angular.
The @NgModule is a class and work with the @NgModule decorator function. @NgModule takes a metadata object that tells Angular “how to compile and run module code”.
The @NgModules page guides you from the most elementary @NgModule to a multi-faceted sample with lazy modules.
The @NgModule main use to simplify the way you define and manage the dependencies in your applications and using @NgModule you can consolidate different components and services into cohesive blocks of functionality.
The Basic Example of @NgModule as,
@NgModule({
  imports: [BrowserModule],
  declarations: [YourComponent],
  bootstrap: [YourComponent]
})
class YourAppModule {}
The @NgModule is a way to organize your dependencies for
1. Compiler
2. Dependency Injection
The declarations of @NgModule.declarations as,
@NgModule({
     declarations: [
        AppComponent,
        YourComponent,
        YourDirective,
        YourPipe,
        ...OTHER DIRECTIVES AND SO ON.
   ]
})
The @NgModule providers as,
@NgModule({
    providers: [
        YourService,
        SomeLibraryService,
    ],
})
The @NgModule exporting as,
@NgModule({
    declarations: [YourComponent, YourPipe]
    exports: [YourComponent, YourPipe],
    providers: [YourService]
})
export class YourModule { }
Why modules needed?
An Angular @NgModule allows us to define a context for compiling templates.
Why @NgModule?
1. Easy to use Components
2. Easy to use Directives
3. Easy to use Pipes
4. Providers’ Inheritance
5. Library Architecture
6. Easy to migrate from angular.module()
7. So on
What is a Root Module?
Each application only has one root module and each component, directive and pipe should only be associated to a single module. This one is the main reason.
How Should We Organize Modules?
There are no standard ways to group modules, but the recommendations are,
1. Features as a module
2. Shared utilities as a module
Module’s Features:-
For example, suppose that your application has customer, product and feature. Each module has some components, directives and pipes.
Module’s Utility:-
For the functions or features that can be shared across modules and application, consider creating a shared module.
How to declaration Module?
import {NgModule, ApplicationRef} from '@angular/core';
import {CommonModule} from '@angular/common';
import {FormsModule} from '@angular/forms';
import {MaterialModule} from '@angular2-material/module';
import {AppComponent} from './app.component';

@NgModule({
  declarations: [AppComponent],
  imports: [BrowserModule, CommonModule, FormsModule, MaterialModule],
  entryComponents: [AppComponent]
})
class AppModule {
  constructor(appRef: ApplicationRef) {
    appRef.bootstrap(AppComponent);
  }
}
//Bootstrapping
import {AppModule} from './app.module';
import {platformBrowserDynamic} from '@angular/browser-platform-dynamic';
platformBrowserDynamic().bootstrapModule(AppModule);

@NgModule
class NgModule {
  declarations: Array;
  imports: Array;
  exports: Array;
  providers: Array >;
  entryComponents: Array;
  schemas: Array;
}
What is One Root Module?
When we create an Angular 2 app, we define a root module. We learned about this in the previous post. This root module is defined with @NgModule and works quite well for small apps.
// app.module.ts
@NgModule({
  imports: [BrowserModule, FormsModule, HttpModule],
  declarations: [
    AppComponent,
    VehicleListComponent,
    VehicleSelectionDirective,
    VehicleSortingPipe
  ],
  providers: [
    LoggerService,
    VehicleService,
    UserProfileService
  ],
  bootstrap: [AppComponent],
})
export class AppModule { }
Our root module declares our components, pipes and directives.
Our root module imports common features from the Angular 2 BrowserModule, FormsModule, and HttpModule.
Final Conclusions are,
1. The Use of NgModule.providers
a. Remove Component.providers
2. Use NgModule.declarations
a. Remove Component.directives/pipes
3. Keep a single scope
4. Use modules
a. Http, Forms, Router, and so on.
5. Make modules
6. Module as a Library
Angular 2 Modules:-
The Angular module — a class decorated with @NgModule — is a fundamental feature of Angular.
JavaScript also has its own module system for managing collections of JavaScript objects. It's completely different and unrelated to the Angular module system.
Angular Modules are the unit of reusability.
Angular modules represent a core concept and play a fundamental role in structuring Angular applications.
Every Angular app has at least one module, the root module, conventionally named AppModule.
Important features such as lazy loading are done at the Angular Module level.
Angular Modules logically group different Angular artifacts such as components, pipes, directives, and so on.
Angular Modules help to organize an application into cohesive blocks of functionalities and extend it with capabilities from external libraries.
App module looks like below,
import { NgModule } from '@angular/core';
import { RouterModule, Routes  } from '@angular/router';
import { HttpModule } from '@angular/http';
import { FormsModule, ReactiveFormsModule } from '@angular/forms';
import { AppComponent } from './components/app/app.component'
import { NavMenuComponent } from './components/navmenu/navmenu.component';
import { HomeComponent } from './components/home/home.component';
import { UserComponent } from './components/user/user.component';
import { UserService } from './components/service/user.service';
import { BarCodePipe } from './components/pipe/custom.pipe';

export const sharedConfig: NgModule = {
    bootstrap: [ AppComponent ],
    declarations: [
        AppComponent,
        NavMenuComponent,
        HomeComponent,
        UserComponent,
        BarCodePipe
    ],
    imports: [
        RouterModule.forRoot([
            { path: '', redirectTo: 'home', pathMatch: 'full' },
            { path: 'home', component: HomeComponent },
            { path: 'user', component: UserComponent },
            { path: '**', redirectTo: 'home' }
        ])
    ],
    providers: [UserService]
};
Angular 1 Module:-
1. Services
2. Directives
3. Controllers
4. Filters
5. Configuration information
6. And so on…
JavaScript Modules:-
In JavaScript Modules, every file is one module. In Angular 2, one component is normally a file.
JavaScript also has its own module system for managing collections of JavaScript objects. It's completely different and unrelated to the Angular module system.
Avoid leaking code to the global namespace and thus to avoid naming collisions.
Encapsulate code to hide implementation details and control what gets exposed to the outside.
Structure our applications and we can’t use a single file.
Manage dependencies and code reuse.
What is the difference between a module's forRoot() and forChild() methods and why do you need it?
The Traceur is a JavaScript compiler. The Traceur compiler used to allow us to use the features from the future. The Traceur compiler is fully supported to ECMAScript(ES6) and ES.vNext also.
The main goal of Traceur compiler is to inform the designs of new JavaScript features and also allow us to write the code in better manners and it also prefer, tell us to use design patterns.
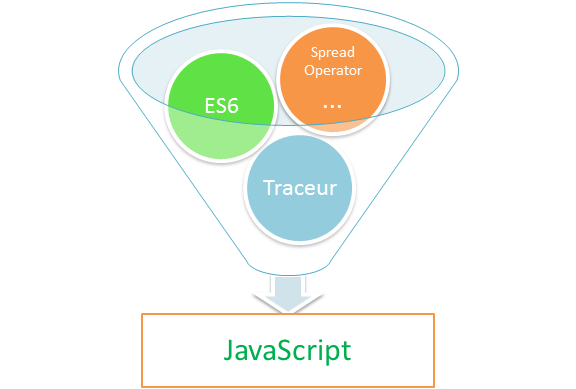
Now the days Traceur compiler are broadly used in Angular 2 because Angular 2 are fully used to ES5 and ES6.
Pipes transform displayed values within a template.
Sometimes, the data is not displays in the well format on the template that time where using pipes.
You also can execute a function in the template to get its returned value.
The Angular 2 have some additional pipes names that are async, decimal, percept and so on. And also some of pipes not supported in angular 2 that are number, orderBy and filter and these are archiving using “custom pipes”.
Key Points:-
Pipe class implements the “PipeTransform” interfaces transform method that accepts an input value and returns the transformed result.
There will be one additional argument to the transform method for each parameter passed to the pipe.
The @Pipe decorator allows us to define the pipe name that is globally available for use in any template in the across application.
For example as,
import { Pipe, PipeTransform } from '@angular/core';

@Pipe({
    name: 'barcode',
    pure: false
})
export class BarCodePipe implements PipeTransform {
    transform(value: string, args: any[]): string {
        if (!value) {
            return '';
        }
        return "****-****_" + (value.length > 8 ? (value.length - 8): '')
    }
}
Angular 2 Built-in Pipes:-
1. DatePipe
2. UpperCasePipe
3. LowerCasePipe
4. CurrencyPipe
5. PercentPipe
6. JsonPipe
7. AsyncPipe
8. And so on..
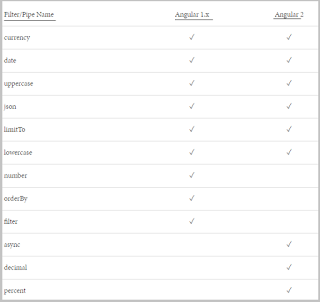
The following table shows a comparison between Angular 1.x and Angular 2.
Why use Pipes?
Sometimes, the data is not displays in the correct format on the template that time where using pipes.
You also can execute a function in the template to get its returned value.
For example as,
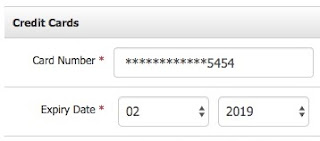
If you want to display the bank card number on your account detail templates that how to displays this card number? I think you should display the last four digits and rest of all digits will display as encrypted like (****-****-****_and your card numbers) that time you will need to create a custom pipe to achieve this.
In Angular 2, there are two types of pipes i.e.
1. Pure
2. Impure
The pure pipe is by default. Every pipe has been pure by default. If you want to make a pipe impure that time you will allow the setting pure flag to false.
Pure Pipes:-
Angular executes a pure pipe only when it detects a pure change to the input value. A pure change can be primitive or non-primitive.
Primitive data are only single values, they have not special capabilities and the non-primitive data types are used to store the group of values.
For example for pipe pure,
import { Pipe, PipeTransform } from '@angular/core';

@Pipe({
    name: 'barcode'
})
export class BarCodePipe implements PipeTransform {
    transform(value: string, args: any[]): string {
        if (!value) {
            return '';
        }
        return "****-****_" + (value.length > 8 ? (value.length - 8): '')
    }
}
Impure Pipes:-
Angular executes an impure pipe during every component change detection cycle. An impure pipe is called often, as often as every keystroke or mouse-move.
If you want to make a pipe impure that time you will allow the setting pure flag to false.
For example for pipe impure,
import { Pipe, PipeTransform } from '@angular/core';

@Pipe({
    name: 'barcode',
    pure: false
})
export class BarCodePipe implements PipeTransform {
    transform(value: string, args: any[]): string {
        if (!value) {
            return '';
        }
        return "****-****_" + (value.length > 8 ? (value.length - 8): '')
    }
}
Explore - Custom Pipes and Inbuilt Pipes with Examples
Angular 2 provides us special kinds of pipe that is called Async pipe and the Async pipe subscribes to an Observable or Promise and returns the latest value it has emitted.
The Async pipe allows us to bind our templates directly to values that arrive asynchronously manner and this is the great ability for the promises and observables.
Example for AsyncPipe with Promise using NgFor,
@Component({
    selector: 'app-promise',
    template: '< ul > < li * ngFor="let user of users | async">  Id: {{user.id }}, Name: {{user.name }} < / li >< / ul >'
})
export class PromiseComponent {
    //USERS DECLARATIONS.
    users = [];

    //FETCHING JSON DATA FROM REST APIS
    userRestApiUrl: string = 'https://api.github.com/users/hadley/orgs';

    //HOME COMPONENT CONSTRUCTOR
    constructor(private userService: UserService) { }

    //GET USERS SERVICE ON PAGE LOAD.
    ngOnInit() {
        this.userService.getUsers(this.userRestApiUrl).subscribe(data => this.users = data);
    }
}
Explore - Custom Pipes and Inbuilt Pipes with Examples
The @Pipe decorator allows us to define the pipe name that is globally available for use in any template in the across application.
Steps for Creating a Custom Pipe:-
1. Create a typescript class.
2. Decorate the class using @Pipe.
3. Implement PipeTransform interface.
4. Override transform() method.
5. Configure the class in application module with @NgModule.
6. Ready to use our custom pipe anywhere in application.
In the below example,
I am using the custom pipe in the user temple to display our custom Ids values at the place of Id.
Table of Component :-
1. user.component.ts
2. user.service.ts
3. custom.barcode.pipe.ts
4. app.module.ts
5. user.component.html
user.component.ts :-
import { Component, Injectable} from '@angular/core';
import { CommonModule } from '@angular/common';
import { HttpModule, Http } from '@angular/http';
import { UserService } from '../shared/service/user.service';
import { BarCodePipe } from '../shared/pipe/custom.barcode.pipe';

@Component({
    selector: 'user',
    templateUrl: './user.component.html',
    styleUrls: ['./user.component.css']
})

export class UserComponent {
    //USERS DECLARATIONS.
    users = [];

    //FETCHING JSON DATA FROM REST APIS
    userRestApiUrl: string = 'https://api.github.com/users/hadley/orgs';

    //HOME COMPONENT CONSTRUCTOR
    constructor(private userService: UserService) {  }

    //GET USERS SERVICE ON PAGE LOAD.
    ngOnInit() {
        this.userService.getUsers(this.userRestApiUrl).subscribe(data => this.users = data);
    }
}
//END BEGIN - USERCOMPONENT
user.service.ts :-
import { Injectable } from '@angular/core';
import { Http, Response } from '@angular/http';
import 'rxjs/add/operator/map';

//BEGIN-REGION - USERSERVICE
@Injectable()
export class UserService {
    constructor(private _http: Http) {
    }

    getUsers(apiUrl) {
        return this._http.get(apiUrl).map((data: Response) => data.json());
    }
}
//END BEGIN – USERSERVICE
custom.barcode.pipe.ts :-
import { Pipe, PipeTransform } from '@angular/core';

@Pipe({
    name: 'barcode',
    pure: false
})
export class BarCodePipe implements PipeTransform {
    transform(value: string, args: any[]): string {
        if (!value) {
            return '';
        }
        return "....-" + (value.length > 2 ? (value.length - 2) : '')
    }
}
app.module.ts :-
import { NgModule } from '@angular/core';
import { RouterModule, Routes } from '@angular/router';
import { UniversalModule } from 'angular2-universal';
import { FormsModule, ReactiveFormsModule } from '@angular/forms';
import { HttpModule } from '@angular/http';
import { AppComponent } from './components/app/app.component';
import { UserComponent } from './components/user/user.component';
import { HeaderComponent } from './components/shared/header/header.component';
import { MenuComponent } from './components/menu/menu.component';
import { LoginComponent } from './components/login/login.component';
import { RegistrationComponent } from './components/registration/registration.component';
import { UserService } from './components/shared/service/user.service';
import { BarCodePipe } from './components/shared/pipe/custom.barcode.pipe';
import { MyPipePipe } from './components/shared/pipe/test.pipes';

@NgModule({
    bootstrap: [ AppComponent ],
    declarations: [
        AppComponent,
        UserComponent,
        HeaderComponent,
        MenuComponent,
        LoginComponent,
        RegistrationComponent,
        BarCodePipe,
        MyPipePipe
    ],
    imports: [
        UniversalModule, // MUST BE FIRST IMPORT. THIS AUTOMATICALLY IMPORTS BROWSERMODULE, HTTPMODULE, AND JSONPMODULE TOO.
        RouterModule.forRoot([ //RouterModule.forRoot method in the module imports to configure the router.
            { path: '', redirectTo: 'user', pathMatch: 'full' },
            { path: 'user/:id', component: UserComponent }, //HERE ID IS A ROUTE PARAMETER.
            { path: 'login', component: LoginComponent },
            { path: 'registration', component: RegistrationComponent },
            { path: '**', redirectTo: 'user' }
        ]),
        FormsModule,
        ReactiveFormsModule
    ],
    providers: [UserService]
})
export class AppModule {
}
For Live Example (explore in details...)
Angular loads as a collection of JavaScript modules. You can think of them as library modules. Each Angular library name begins with the @angular prefix. Install them with the node package manager npm and import parts of them with JavaScript import statements.
For example, import Angular's Component decorator from the @angular/core library like this.
import { Component } from '@angular/core';
You also import NgModules from Angular libraries using JavaScript import statements. For example, the following code imports the BrowserModule NgModule from the platform-browser library.
import { BrowserModule } from '@angular/platform-browser';
In the example of the simple root module above, the application module needs material from within BrowserModule. To access that material, add it to the @NgModule metadata imports like this.
imports: [ BrowserModule ],
Refrence - https://angular.io/guide/architecture-modules#angular-libraries
Angular lets you extend HTML with new attributes called directives.
Marks a class as an Angular directive. See more...
Directive classes, like component classes, can implement life-cycle hooks to influence their configuration and behavior.
There are 3 types of directives in Angular.
1. Components Directives - directives with a template
2. Structural Directives - change the DOM layout by adding and removing DOM elements.
3. Attribute Directives - change the appearance or behavior of an element, component, or other directive.
There are two other kinds of Angular directives,
1. Components
2. Attribute directives
What Are Components Directives?
A component is a directive with a template and the @Component decorator is actually a @Directive decorator extended with template oriented features.
1. To register a component, we use @Component meta-data annotation.
2. The directives are used to add behavior to existing DOM elements.
3. The directives are used to design a reusable component.
4. Only one component can be present per DOM element.
5. Multiple directives are used per DOM element.
6. The directive does not have @View etc.
What Are Structural Directives?
The Structural directives are responsible for HTML layout. They shape or reshape the DOM structure; it is using for adding, removing and manipulating the elements.
The Structural directives is used to enable an element as a template for creating additional elements. If you want to create structural directive that time you should have knowledge of < template > elements and structural directives are easy to recognize.
The two familiar examples of structural directive as,
1. *ngIf
2. *ngfor
An asterisk (*) precedes the directive attribute name as,
< div *ngIf="user" >{{user.name}}< / div >
How to creating a structural directive?
@Directive({
  selector: '[appDelay]'
})
export class DelayDirective {
  constructor(
    private templateRef: TemplateRef,
    private viewContainerRef: ViewContainerRef
  ) { }

  @Input()
  set appDelay(time: number): void { }
}
How to create multiple structural directives?
See more detail...
What Are Attribute Directives?
Attribute directives are used to change the behavior, appearance or look of an element on a user input or via data from the service.
For example as,
import {Component, View} from 'angular2/core'';

@Component({
    selector: 'user-detail'
})

@View({
    template: "< h1 >{{userName}}{{phone}}< / h1 >"
})

class userDetail {
    constructor(public userName: string, public phone: string) {}
}

//HTML
< user-detail >< / user-detail >
Some Other Directive :
Router-outlet directive: - Router-outlet directive is used to render the components for specific location of your applications. Both the template and templateUrl render the components where you use this directive.
Syntax:-
< router-outlet > < / router-outlet >
Router-link directive:- Router-link directive is used to link a specific part of your applications.
Syntax:-
< router-link > < / router-link >
Example,
< a [router-link]="['/AboutMe']" >About Me< / a >
The Route-Config: - The route config is used to map components to URLs.
Syntax:-
@RouteConfig([
        {path: '/',        component: Home_Component, as: 'Home'},
        {path: '/AboutMe', component: AboutMe_Component, as: 'AboutMe'  }
        {path: '/ContactMe', component: ContactMe_Component, as: 'ContactMe'  }
    ])
The Route Params: - The route parameter is used to map given URL's parameters based on the rout URLs and it is an optional parameters for that route.
Syntax:-
params : {[key: string]: string}Example as,
@RouteConfig([
         {path: '/employ/:id', component: employe, name: 'emp'},
])
A template is a HTML view that tells Angular 2 for render your components in the views.
The Angular 2 templates are very similar to Angular 1 but Angular 2 has some small syntactical changes.
You can see the changes as below,
1. {}: Is use to rendering the HTML elements.
2. []: Is use to binding properties.
3. (): Is use to handling your events.
4. [()]: Is use to data binding.
5. *: Is use to asterisk Operations like *ngFor="let item of items; let i=index;”
The templates can be inline or external separate files.
How to use {}, [], [] and [()] in Angular2 Template?
Here, I am using Inline Template in the user components i.e.
import { Component } from '@angular/core';

@Component({
    selector: 'Users',
    template: `< div >
            < input (keyup)="onKey($event)" (click)="onClick()" / >
            < div [hidden]="isActive" class="info" >
                < h2 >Active element or Not?< / h2 >
                < div >{{values}}< / div >
            < / div >
     < / div >`,
    styleUrls: ['./user.component.css']
})

export class UsersComponent {
    values: string;
    isActive: boolean = false;

    onKey(event) {
        this.isActive = true;
        this.values += event.target.value;
    }
}
What Are Differences in template and templateUrl?
Inline templates are specified directly in the component using template and it is more complex for bigger templates. As per expert suggestions, use templates and styles into a separate file, when your code more than 5 to 10 lines.
External templates define the HTML in a separate file and reference this file in templateUrl.
To use a relative path in the templateUrl we must include import component form @angular/core
Some befits for template Urls i.e.
1. Separations of code
2. Easy debugging
The upcoming offline template compiler will inline templates linked by templateUrl.
Example for Inline Template :-
import { Component } from '@angular/core';
import { CommonModule } from '@angular/common';
import { HttpModule, Http } from '@angular/http';
import { UserService } from '../service/user.service';
import { AppGlobals } from '../../shared/app.globals';

@Component({
    selector: 'users-app',
    template: `< div *ngFor="let user of users; let i = index" >
                    < div >{{user.id }}< / div >
                    < div >{{user.id | barcodepipe:true}}< / div >
                    < div >{{user.login}}< / div >
                    < div >{{user.description}}< / div >
                    < div >< a href="{{user.public_members_url}}" target="_blank" >{{user.public_members_url}}< / a >< / div >
              < / div >`,
    styleUrls: ['./user.component.css'],
    providers: [UserService, AppGlobals],
})
export class UsersApp {
    //USERS DECLARATIONS.
    users = [];

    //USER COMPONENT CONSTRUCTOR.
    constructor(private _userService: UserService,
        private _global: AppGlobals) { }

    //GET USERS SERVICE ON PAGE LOAD and BIND UI GRID.
    ngOnInit() {
        this._userService.getAPIUsers(this._global.baseAPIUrl + 'users/api/GetUsers').subscribe(data => this.users = data);
    }
}
Example for external templates - Separate file:-
import { Component} from '@angular/core';
import { CommonModule } from '@angular/common';
import { HttpModule, Http } from '@angular/http';
import { UserService } from '../service/user.service';
import { AppGlobals } from '../../shared/app.globals';

@Component({
    selector: 'users-app',
    templateUrl: './user.component.html',
    styleUrls: ['./user.component.css'],
    providers: [UserService, AppGlobals],
})
export class UsersApp {
  //USERS DECLARATIONS.
    users = [];

    //USER COMPONENT CONSTRUCTOR.
    constructor(private _userService: UserService,
        private _global: AppGlobals) { }

    //GET USERS SERVICE ON PAGE LOAD and BIND UI GRID.
    ngOnInit() {
        this._userService.getAPIUsers(this._global.baseAPIUrl + 'users/api/GetUsers').subscribe(data => this.users = data);
    }
}
What Are differences between templateUrl and styleUrls?
The styleUrls is a component which uses to write inline styles, style Urls and template inline style.
See more...
The “styles” or “styleUrls” should only be used for css rules and it is affect the style of the template elements.
This is the best approaches to add styles directly to the components and the view encapsulation is set per component. It is use for some situations.
An example to add external styles to the components result text color is red,
Syntax :–
@Component({
    selector: 'home',
    templateUrl: './home.component.html',
    styleUrls: ['./home.component.css'],
    styles: ['.tbl-row-border { border: 1px solid red;}','.txt-color{color:red;}']
})
See example in detail...How To Import CSS using System.import?
You do need the “System.import” to bootstrap and run your application.
It can't run without it, and if it does, you might have a cashed version in your browser.
The error is -
This error indication that some of the script files didn't get loaded correctly!
syntax error: unexpected token <Syntax is -
System.import('./app/bootstrap/css/boots-trap.css!').then(() => {
    System.import('./app/main-app.css!');
});
An example to add external styles to components as,
@Component({
    selector: 'app',
    templateUrl: 'app/login.html',
    styleUrls: [
        'app/app.css',
        'app/main.css'
    ],
    encapsulation: ViewEncapsulation.None,
})

export class Component {}
Dependency Injection is a powerful pattern for managing code dependencies.
Angular Dependency Injection consists of three things.
1. Injector
2. Provider
3. Dependency
Injector :- The injector object use to create instances of dependencies.
Provider :- A provider is help to injector for create an instance of a dependency. A provider takes a token and maps that to a factory function that creates an object.
Dependency:- A dependency is the type of which an object should be created.
@Injectable() marks a class as available to an injector for instantiation. An injector reports an error when trying to instantiate a class that is not marked as @Injectable().
Injectors are also responsible for instantiating components. At the run-time the injectors can read class metadata in the JavaScript code and use the constructor parameter type information to determine what things to inject.
 How To use Dependency Injection (DI) correctly?
The basics Steps of Dependency injection,
1. A class with @Injectable() to tell angular 2 that it’s to be injected “UserService”.
2. A class with a constructor that accepts a type to be injected.
Example, UserService marked as @Injectable as,
How To use Dependency Injection (DI) correctly?
The basics Steps of Dependency injection,
1. A class with @Injectable() to tell angular 2 that it’s to be injected “UserService”.
2. A class with a constructor that accepts a type to be injected.
Example, UserService marked as @Injectable as,
import {Injectable, bind} from 'angular2/core';
import {Http} from 'angular2/http';

@Injectable() /* This is #Step 1 */
export class UserService {
  constructor(http: URL /* This is #Step 2 */ ) {
    this.http = URL;
  }
}
Example as,
import {Injectable} from "@angular/core";

@Injectable()
export class InjectToService {
    id: string;

    constructor() {
        this.resetPasscode();
    }

    resetPasscode(): void {
        this.id = this.generatePasscode();
    }

    private generatePasscode(): string {
        var date = new Date().getTime();

        var pascode = '00X000-00000-7000-Z0000-00000'.replace(/[xy]/, function(f) {
            var random = (date + Math.random() * 16) % 16 | 0;
            date = Math.floor(date / 16);
            return (f == '0' ? random : (random & 0x3 | 0x8)).toString(16);
        });

        return pascode;
    };
}
Why @Injectable()?
@Injectable () marks a class as available to an injector for instantiation. An injector reports an error when trying to instantiate a class that is not marked as @Injectable ().
Injectors are also responsible for instantiating components. At the run-time the injectors can read class metadata in the JavaScript code and use the constructor parameter type information to determine what things to inject.
Example as,
import { Injectable, InjectionToken } from '@angular/core';
import { Http, Response } from '@angular/http';

@Injectable()
export class UserService {
    constructor(private _http: Http) {
    }

    getAPIUsers(apiUrl) {
        return this._http.get(apiUrl).map((data: Response) => data.json());
    }
}
Why @Inject()?
@Inject() is a special technique for letting Angular know that a parameter must be injected.
Example as,
import { Inject} from '@angular/core';
import { Http, Response } from '@angular/http';

class UserService {
    users: Array< any >;

    constructor( @Inject(Http) _http: Http) {
    }
}
What Are the differences between @Injectable() vs. @Inject()?
See more...
What are Zones? What Is NgZone? Angular 2 runs inside of its own special zone called NgZone and this special zone extends the basic functionality of a zone to facilitate change detection. It is Running inside a zone allows to detect when asynchronous tasks. If you change or update your internal application code or view and it is detecting the applications changes with help of NgZone. Application state change by following things as, 1.Events – Looks like as click, change, input, submit, etc. 2.XMLHttpRequests – It’s occurs when we fetch data from a remote service. 3.Timers – when you use timer methods such as setTimeout (), setInterval (), etc. What Is Change Detection? Angular 2 runs inside of its own special zone called NgZone and this special zone extends the basic functionality of a zone to facilitate change detection. A zone is not a concept that is specific to Angular 2 and these Zones features or functionality can be added to any JavaScript application with the inclusion of the “Zone.js” library. What Is NgZone run outside Angular 2? Execute the “fn” functions asynchronously in Angular’s parent zone and returns value returned by the function. Syntax :-
NgZone.runOutsideAngular(fn:() => any): anyExample using NgZone as,
import { Component, NgZone} from '@angular/core';
import { CommonModule } from '@angular/common';
import { HttpModule, Http } from '@angular/http';
import { UserService } from '../service/user.service';
import { AppGlobals } from '../../shared/app.globals';

@Component({
    selector: 'user',
    templateUrl: './user.component.html',
    styleUrls: ['./user.component.css'],
    providers: [UserService, AppGlobals]
})

export class UserComponent {
    //USERS DECLARATIONS.
    users = [];
    label: string;
    counter: number = 0;

    //USER COMPONENT CONSTRUCTOR.
    constructor(private _userService: UserService,
        private _global: AppGlobals,
        private _ngZone: NgZone)
    { }

    //GET USERS SERVICE ON PAGE LOAD and BIND UI GRID.
    ngOnInit() {
        this._userService.getAPIUsers(this._global.baseAPIUrl + 'users/hadley/orgs').subscribe(data => this.users = data);
        this._userService.getAppUsers(this._global.baseAppUrl + 'api/User/GetUsers').subscribe(data => console.log(data));
    }

    // Loop inside the Angular zone.
    // The UI will refresh after each setTimeout cycle.
    insideOfAngularZone() {
        this.label = 'inside loop';
        this.counter = 0;
        this._increaseCounter(() => alert('Inside loop completed.'));
    }

    // Loop outside of the Angular zone.
    // The UI will not refresh after each setTimeout cycle.
    outsideOfAngularZone() {
        this.label = 'outside loop';
        this.counter = 0;
        this._ngZone.runOutsideAngular(() => {
            this._increaseCounter(() => {
                this._ngZone.run(() => {
                    alert('Outside loop completed.');
                });
            });
        });
    }

    _increaseCounter(doCallback: () => void) {
        this.counter += 2;

        if (this.counter <= 1000) {
            window.setTimeout(() => {
                this._increaseCounter(doCallback);
            }, 100);
        }
        else {
            doCallback();
        }
    }
}
//END BEGIN - USER-COMPONENT
What would be a good use for NgZone Service?
Angular 2 runs inside of its own special zone called NgZone and this special zone extends the basic functionality of a zone to facilitate change detection.
It is Running inside a zone allows to detect when asynchronous tasks.
If you change or update your internal application code or view and it is detecting the applications changes with help of NgZone.
Example 1 - We use NgZone to trigger change detection as
import { Component, NgZone} from '@angular/core';
import { CommonModule } from '@angular/common';
import { HttpModule, Http } from '@angular/http';
import { UserService } from '../service/user.service';
import { AppGlobals } from '../../shared/app.globals';


@Component({
    selector: 'user',
    templateUrl: './user.component.html',
    styleUrls: ['./user.component.css'],
    providers: [UserService, AppGlobals]
})

export class UserComponent {
    //USERS DECLARATIONS.
    users = [];
    label: string;
    counter: number = 0;

    //USER COMPONENT CONSTRUCTOR.
    constructor(private _userService: UserService,
        private _global: AppGlobals,
        private _ngZone: NgZone)
    { }

    //GET USERS SERVICE ON PAGE LOAD and BIND UI GRID.
    ngOnInit() {
        this._userService.getAPIUsers(this._global.baseAPIUrl + 'users/hadley/orgs').subscribe(data => this.users = data);
        this._userService.getAppUsers(this._global.baseAppUrl + 'api/User/GetUsers').subscribe(data => console.log(data));
    }

    // Loop inside the Angular zone.
    // The UI will refresh after each setTimeout cycle.
    insideOfAngularZone() {
        this.label = 'inside loop';
        this.counter = 0;
        this._increaseCounter(() => alert('Inside loop completed.'));
    }

    // Loop outside of the Angular zone.
    // The UI will not refresh after each setTimeout cycle.
    outsideOfAngularZone() {
        this.label = 'outside loop';
        this.counter = 0;
        this._ngZone.runOutsideAngular(() => {
            this._increaseCounter(() => {
                this._ngZone.run(() => {
                    alert('Outside loop completed.');
                });
            });
        });
    }

    _increaseCounter(doCallback: () => void) {
        this.counter += 2;

        if (this.counter <= 1000) {
            window.setTimeout(() => {
                this._increaseCounter(doCallback);
            }, 100);
        }
        else {
            doCallback();
        }
    }
}
//END BEGIN - USER-COMPONENT
Example 2 -We use NgZone to trigger change detection as,
constructor(_ngZone:NgZone) {
    window.onresize = (e) =>
    {
        _ngZone.run(() => {
            this.width = window.innerWidth;
            this.height = window.innerHeight;
        });
    };
}

import {ChangeDetectorRef} from '@angular2/core'

export class SideNav {
    innerWidth: number;

    constructor(private window: Window, private _cdr: ChangeDetectorRef){

       let getWindow = () => {
          return window.innerWidth;
       };

      window.onresize = () => {
          this.innerWidth = getWindow();
          this._cdr.detectChanges(); //running change detection manually!
      };
    }
}
What Are Isolated Unit Tests? The Isolated unit tests check-up an instance of a class itself without using any Angular dependence or any injected values. Mostly application tester creates a test instance of the class with new keyword and supplying test doubles for the constructor parameters and then investigation the test instance. The isolated unit tests don't realize how components interact with Angular and also don't realize how a component class interacts with its own template or components. For testing Angular Pipes and Services - we should write isolated unit tests! The isolated unit tests don't realize how components interact with Angular and also don't realize how a component class interacts with its own template or components. The most familiar Unit Test for the Tester and Developers as following - 1.Create an Instances directly with new keyword 2.Angular Agnostic Testing Techniques 3.Exhibit Standard 4.Substitute Test The Most of the Tester and Developers are tried to avoid Unit Testing following methodology- 1.Import from the Angular Test Libraries - @angular/core/testing 2.Configure Angular module 3.Prepare Dependency Injection Providers 4.Call Inject or (async/fakeAsync) Example as, This example is used to display Credit Card Number with a custom formatted in the user templates.
import { Pipe, PipeTransform } from '@angular/core';

@Pipe({
    name: 'barcode',
    pure: false
})
export class BarCodePipe implements PipeTransform {
    transform(value: string, args: any[]): string {
        if (!value) {
            return '';
        }
        return "****-****_" + (value.length > 8 ? (value.length - 8): '')
    }
}
Unit Testing to the Pipe - BarCodePipe
describe('BarCodePipe', () => {
  let pipe = new BarCodePipe();

  //Todo tests ...
});
See more...
What Are Angular Testing Utilities?
The Angular Testing utilities include the TestBed class and helper functions from the test libraries - @angular/core/testing.
The TestBed class is one of the principal Angular testing utilities!
The TestBed class is responsible for configuring and initializing the environment that we are going to write our tests in by calling TestBed.configureTestingModule.
The TestBed.configureTestingModule is used to define the environment that we want our component under test to live in.
The Angular Testing utility APIs are,
1.getTestBed
2.async
3.fakeAsync
4.tick
5.inject
6.discardPeriodicTasks
7.flushMicrotasks
8.ComponentFixtureAutoDetect
The most important static methods are,
1. configureTestingModule
2. compileComponents
3. createComponent
4. overrideModule
5. overrideComponent
6. overrideDirective
7. overridePipe
8. get
9. initTestEnvironment
10. resetTestEnvironment
See more...
Example As,
beforeEach(() => {
  fixture = TestBed.configureTestingModule({
    declarations: [YourComponent ]
  })
  .createComponent(YourComponent);
});
What Is Angular 2 Service? Angular 2 service is a class that encapsulates some methods (GET/POST/PUT) and provides it result as a service for across your application. What Are the Features of Angular 2 Service? The Angular 2 is using services concept and it provide the multiple features to us that are, 1. Services are singleton objects. 2. Services are capable of returning the data in the form promises or observables. 3. Service class is decorated with Injectable decorator. 4. The Injectable decorator is required only if our service class is making use of some Angular injectable like Http, Response and HttpModule service within it. What are the differences between Observables & Promises? 1. Promise:- Promises are only called once and It can return only a single value at a time and the Promises are not cancellable. 2. Observables:- Observables handle multiple values over time and it can return multiple values and the Observables are cancellable. 3. The Observables are more advanced than Promises. Steps for creating an Angular 2 Service:- There are four steps as, 1.Import the injectable member i.e. import {Injectable} from '@angular/core'; 2.Import the HttpModule, Http and Response members’ i.e. import { HttpModule, Http, Response } from '@angular/http'; 3. Add the @Injectable Decorator i.e. @Injectable() 4. Export to the Service class i.e.
export class UserService {
    constructor(private _http: Http) {  }
}
Steps for Calling an Angular 2 Service in the Angular 2 Component class:-
There are four steps to calling a service in component as,
1.Create or Import the Service to the component class.
2.Add it as a component provider.
3.Include it through Dependency Injection.
4.Use the Service function in the component.
In the below Example,
I hope this will help you to understand and create the basic of Angular 2 service. I am creating a user service and this user service returns the list of users.
After creating user service, I will use the user service “getUsers()” method in the user component’s ngOnInit() method to load the returns user collections on user screen.
I am also using the REST API Url (https://api.github.com/users/hadley/orgs) and this RESTful API will returns the users.
app.module.ts :-
import { NgModule } from '@angular/core';
import { RouterModule, Routes } from '@angular/router';
import { UniversalModule } from 'angular2-universal';
import { FormsModule, ReactiveFormsModule } from '@angular/forms';
import { HttpModule } from '@angular/http';
import { AppComponent } from './components/app/app.component';
import { UserComponent } from './components/user/user.component';
import { HeaderComponent } from './components/shared/header/header.component';
import { MenuComponent } from './components/menu/menu.component';
import { LoginComponent } from './components/login/login.component';
import { RegistrationComponent } from './components/registration/registration.component';

@NgModule({
    bootstrap: [ AppComponent ],
    declarations: [
        AppComponent,
        UserComponent,
        HeaderComponent,
        MenuComponent,
        LoginComponent,
        RegistrationComponent
    ],
    imports: [
        UniversalModule, // MUST BE FIRST IMPORT. THIS AUTOMATICALLY IMPORTS BROWSERMODULE, HTTPMODULE, AND JSONPMODULE TOO.
        RouterModule.forRoot([ //RouterModule.forRoot method in the module imports to configure the router.
            { path: '', redirectTo: 'user', pathMatch: 'full' },
            { path: 'user/:id', component: UserComponent }, //HERE ID IS A ROUTE PARAMETER.
            { path: 'login', component: LoginComponent },
            { path: 'registration', component: RegistrationComponent },
            { path: '**', redirectTo: 'user' }
        ]),
        FormsModule,
        ReactiveFormsModule
    ]
})
export class AppModule {
}
user.component.ts and user.service.ts :-
import { Component, Injectable} from '@angular/core';
import { CommonModule } from '@angular/common';
import { HttpModule, Http, Response } from '@angular/http';

//BEGIN-REGION - USERSERVICE
@Injectable()
export class UserService {
     constructor(private _http: Http) {  }

    getUsers(apiUrl) {
        return this._http.get(apiUrl).map((data: Response) => data.json());
    }
}
//END BEGIN - USERSERVICE

//BEGIN-REGION - USERCOMPONENT
@Component({
    selector: 'user',
    templateUrl: './user.component.html',
    styleUrls: ['./user.component.css'],
    providers: [UserService]
})

export class UserComponent {
    //USERS DECLARATIONS.
    users = [];

    //FETCHING JSON DATA FROM REST APIS
    userRestApiUrl: string = 'https://api.github.com/users/hadley/orgs';

    //HOME COMPONENT CONSTRUCTOR
    constructor(private userService: UserService) {  }

    //GET USERS SERVICE ON PAGE LOAD.
    ngOnInit() {
        this.userService.getUsers(this.userRestApiUrl).subscribe(data => this.users = data);
    }
}
//END BEGIN – USERCOMPONENT
See more...
Also Explore - Angular 2 http Service Requests with Example
Angular 2 cookies concept is very similar to the Angular 1.x but Angular2 added only one extra method to remove all cookies i.e. removeAll() The All cookie methods are 1. get() 2. getObject() 3. getAll() 4. put() 5. putObject() 6. remove() 7. removeAll() - This is new one in angular 2 get() :- This method is returns the value of given cookie key. getObject() :- This method is returns the desterilized value of given cookie key. getAll() :- This method is returns a key value object with all the cookies. put() :- This method is use to set a value for given cookie key. putObject() :- This method is use to serializes and set a value for given cookie key. remove() :- This method is use to remove given cookie. removeAll() :- This method is use to remove all cookies. You can create your own functions to get cookie value, set cookie value and delete cookie value. Two ways to create cookies - 1. You can inject a service in the components providers. 2. You can get it via npm. To install ng2-cookies library, run the below given code i.e.
npm install angular2-cookie --saveYou can include angular2-cookie library for the same which has given below.
< script src="~/cookie/angular2-cookie.min.js">< / script >Example - You can get it via npm The full example for creating your own functions as,
@Component({
    selector: 'cookie-consent',
    template: cookieconsent_html,
    styles: [cookieconsent_css]
})
export class CookieConsent {
    private isConsented: boolean = false;

    constructor() {
        this.isConsented = this.getCookie(COOKIE_CONSENT) === "1";
    }

    private getCookie(name: string) {
        let ca: Array = document.cookie.split(';');
        let caLen: number = ca.length;
        let cookieName = name + "=";
        let c: string;

        for (let i: number = 0; i < caLen; i += 1) {
            c = ca[i].replace(/^\s\+/g, "");
            if (c.indexOf(cookieName) == 0) {
                return c.substring(cookieName.length, c.length);
            }
        }
        return "";
    }

    private deleteCookie(name) {
        this.setCookie(name, "", -1);
    }

    private setCookie(name: string, value: string, expireDays: number, path: string = "") {
        let d:Date = new Date();
        d.setTime(d.getTime() + expireDays * 24 * 60 * 60 * 1000);
        let expires:string = "expires=" + d.toUTCString();
        document.cookie = name + "=" + value + "; " + expires + (path.length > 0 ? "; path=" + path : "");
    }

    private consent(isConsent: boolean, e: any) {
        if (!isConsent) {
            return this.isConsented;
        } else if (isConsent) {
            this.setCookie(COOKIE_CONSENT, "1", COOKIE_CONSENT_EXPIRE_DAYS);
            this.isConsented = true;
            e.preventDefault();
        }
    }
}
Example 2 - You can inject a service in the components providers
//Use of Angular 2 cookies, the example in detail as give below.
import {Component} from '@angular2/core';
import {Cookie} from '@angular2-cookie/core';

@Component({
    selector: 'my-cookie-app',
    template: '< div >Cookies in Angular 2< / div >',
    providers: [Cookie]
})

export class App_Component {
    constructor(private _cookie:Cookie){}

    getCookie(key: string){
        return this._cookie.get(key);
    }

    getCookieObject(key: string){
        return this._cookie.getObject(key);
    }
}

//And other are available methods [put(), putObject(), remove() and removeAll()]
//All methods work similar like above methods.