In this article, I will show you how to setup form validation in Angular 6. Also, I am
using a simple registration form with standard fields –
1.
Name
2.
Email
3.
Gender
4.
Country
5.
Site URL
6.
Password
All fields are required, plus the email field must be a
valid email address, site URL field must be a valid URL and the password field
must have a min-length of 6.
Steps involved as following –
1.
Create a project with the help of CLI command
– ng g new Project_Name
2.
Go to the created project directory
3.
Create customer components with the help of
CLI command – ng g component comp_name
4.
Import the FormsModule, RouterModule,
CustomerComponent, routing for navigating add customer page in the NgModule.
5.
Finally come to app.module.ts
6.
Result
The following Examples as–
Create a project
ng g
new ng6FormValidation
Create customer components –
customer.component.ts –
import
{ Component, OnInit
} from '@angular/core';
@Component({
selector: 'app-customer',
templateUrl: './customer.component.html',
styleUrls: ['./customer.component.css']
})
export
class CustomerComponent
implements OnInit
{
model: any
= {};
countries : any;
constructor() {
}
ngOnInit() {
//Get country list.
this.countries
=[
{"id" :1,
"name":
"India",
"code":"IN"},
{"id" :2,
"name":
"Nepal",
"code":"NP"},
{"id" :3,
"name":
"United Arab Emirates",
"code":
"AE"},
{"id" :4,
"name":
"United Kingdom",
"code":
"GB"},
{"id" :5,
"name":
"United States",
"code":
"US"},
{"id" :6,
"name":
"Australia",
"code":
"AU"},
{"id" :7,
"name":
"Austria",
"code":
"AT"},
{"id" :8,
"name":
"Canada",
"code":
"CA"},
{"id" :9,
"name":
"China",
"code":
"CN"},
];
//Default
selected country Id.
//this.model.country = 5;
}
public onSubmitCustomer()
{
alert('Your
information has been submitted successfully. :-)\n\n'
+ JSON.stringify(this.model))
}
}
And customer.component.html –
<h1>Register
Customer</h1>
<hr>
<form
name="form"
(ngSubmit)="f.form.valid
&&
onSubmitCustomer()" #f="ngForm"
novalidate>
<div
class="container">
<label
for="name"><b>Emp
Name</b></label>
<input
type="text"
placeholder="Enter
Name" name="name"
[(ngModel)]="model.name"
#name="ngModel"
[ngClass]="{
'is-invalid': f.submitted &&
name.invalid }" required>
<div
*ngIf="f.submitted
&& name.invalid"
class="invalid-text">
<div
*ngIf="name.errors.required">Name
is required</div>
</div>
<label
for="email"><b>Email</b></label>
<input
type="text"
placeholder="Enter
Email" name="email"
[(ngModel)]="model.email"
#email="ngModel"
[ngClass]="{
'is-invalid': f.submitted &&
email.invalid }" required
email>
<div
*ngIf="f.submitted
&&
email.invalid" class="invalid-text">
<div
*ngIf="email.errors.required">Email
is required</div>
<div
*ngIf="email.errors.email">Email
must be a valid email address</div>
</div>
<label
for="gender"><b>Gender</b></label>
<select
placeholder="Select
Gender" name="gender"
[(ngModel)]="model.gender"
#gender="ngModel"
[ngClass]="{
'is-invalid': f.submitted &&
gender.invalid }" required>
<option>Male</option>
<option>Female</option>
<option>Other</option>
</select>
<div
*ngIf="f.submitted
&&
gender.invalid" class="invalid-text">
<div
*ngIf="gender.errors.required">Gender
is required</div>
</div>
<br>
<label
for="country"><b>Country</b></label>
<select
placeholder="Select
country" name="country"
[(ngModel)]="model.country"
#country="ngModel"
[ngClass]="{
'is-invalid': f.submitted &&
country.invalid }" required>
<option
*ngFor="let
country of countries" [value]="country.id">
{{country.name}}</option>
</select>
<div
*ngIf="f.submitted
&&
country.invalid" class="invalid-text">
<div
*ngIf="country.errors.required">Country
is required</div>
</div>
<br>
<label
for="site"><b>Site
URL</b></label>
<input
type="url"
placeholder="Enter
site URL" name="site"
pattern="https?://.+"
[(ngModel)] ="model.site"
#site="ngModel"
[ngClass]="{
'is-invalid': f.submitted &&
site.invalid }"
required url>
<div
*ngIf="f.submitted
&& site.invalid"
class="invalid-text">
<div
*ngIf="site.errors.required">Site
is required</div>
<div
*ngIf="site.errors.pattern">Must
be a valid site URL</div>
</div>
<label
for="psw-repeat"><b>Password</b></label>
<input
type="password"
placeholder="Password"
name="pwd"
[(ngModel)]="model.pwd"
#pwd="ngModel"
[ngClass]="{
'is-invalid': f.submitted &&
pwd.invalid }" required
minlength="6">
<div
*ngIf="f.submitted
&& pwd.invalid"
class="invalid-text">
<div
*ngIf="pwd.errors.required">Password
is required</div>
<div
*ngIf="pwd.errors.minlength">Password
must be at least 6 characters</div>
</div>
<hr>
<p>By
creating an account you agree to our <a
href="#">Terms
& Privacy</a>.</p>
<button
type="submit"
class="registerbtn">Register</button>
</div>
<div
class="container
signin">
<p>Already
has an account? <a
href="#">Sign
in</a>.</p>
</div>
</form>
Import the FormsModule, RouterModule,
CustomerComponent, routing for navigate add customer page in the NgModule. Now
the NgModule looks like.
import
{ BrowserModule } from
'@angular/platform-browser';
import
{ NgModule } from
'@angular/core';
import
{FormsModule} from
'@angular/forms';
import
{RouterModule} from
'@angular/router';
import
{ AppComponent } from
'./app.component';
import
{ CustomerComponent
} from './customer/customer.component';
@NgModule({
declarations: [
AppComponent,
CustomerComponent
],
imports: [
BrowserModule,
FormsModule,
RouterModule.forRoot([{
path:'customer-link',
component:CustomerComponent
}
])
],
providers: [],
bootstrap: [AppComponent]
})
export
class AppModule
{ }
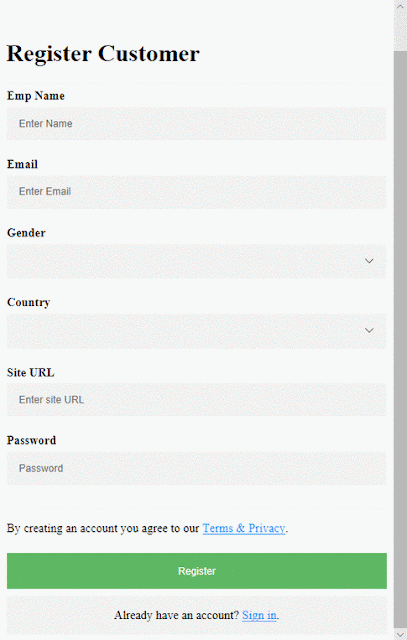
Result looks like –
